Hello, finally I've written down the pattern for Mr Bear clothes. It is available for free.
I'm working on the pattern for Lady Bear - soon I will post it on my blog.
Have a nice crocheting and don't forget to crochet with me - I recommend you to watch free tutorials on my YouTube channel ;-) I've already published the whole written pattern for Bears in Love (bears and outfit) in printable PDF file on Etsy.
***
MR BEAR OUTFIT (jacket, trousers and bow tie)
JACKET
I use yarn Lisa Red Heart, color grey (main) and mint (for edging), crochet hook 3 mm.
Work in rows.
Row 1: ch 71, insert the hook in 2nd chain from hook and work 70 sc, turn [70]
Row 2: ch 3, (FPDC, BPDC) x 34 and 1 dc at the end, 1 tch, turn [70]
Row 3: 70 sc, 1 tch, turn [70]
Row 4: 14 sc, (5 sc, dec) x 6, 14 sc, 1 tch, turn [64]
Row 5: 14 sc, (4 sc, dec) x 6, 14 sc, 1 tch, turn [58]
Rows 6–13: 58 sc, 1 tch, turn [58]
Don’t cut the yarn and start part I from row 14 (see the picture below).
After crocheting row 13 turn your work and crochet row 14
(PART 1). We start from even row, so it is the wrong side.
(PART 1). We start from even row, so it is the wrong side.
PART I
Rows 14–23: 14 sc, 1 tch, turn [14]
Row 24: 14 sc [14]
Cut the yarn and work remaining two parts, starting from row 14.
When we work even rows – it is wrong side, and odd rows – right side. Actually it doesn’t matter which side you choose to be the right or left at this stage of work but you should remember to weave in loose ends at one chosen side.
Skip 5 st and work the centre part (PART II) of 20 sc through 11 rows (rows 14–24). Remember to make 1 tch at the end of every row. Cut the yarn and crochet PART III.
Skip 5 st and work 14 sc of part III – similar to part I.
After making PART III don’t cut the yarn – 1 tch, turn the work and crochet row 25 (see the picture below). In row 25 we join all three parts (starting from PART III, through PART II to PART I).
There are ch 3 between each part.
Row 25: 14 sc (III), ch 3 (bridge), 20 sc (II), ch 3 (bridge),
14 sc (I) [54]
Crochet row 25 – it is the right side.
Rows 26–27: 54 sc [54]
Try on the jacket and adjust it – if you would like to make wider collar, work more rows.
SLEEVE (make 2)
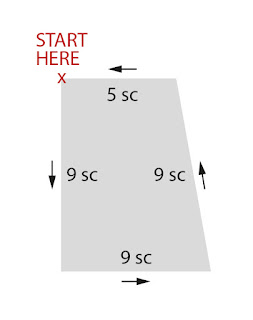
One sleeve counts 30 sc around: 3 sc on the top, 5 sc on the bottom, 11 sc on the left and right side. Start from the right bottom corner and crochet in continuous rounds (see the picture below).
Rnds 1–5: 30 sc [30]
Rnd 6: ch 3, (FPDC, BPDC) x 15, sl st
Rnd 7: ch 1, 30 sc [30]
Finally I work single crochets around the edge of each sleeve and jacket using yarn in different color (mint) to create the edging.
TROUSERS
I use yarn Lisa Red Heart bluejeans color, two buttons, crochet hook 3 mm.
Ch 6, insert the hook in 2nd chain from hook and work in rows. First I crochet the belt.
Rows 1–66: 5 sc in BLO, 1 tch, turn [5]
Join two ends in a circle with 5 sl st. Turn the belt on the right side (to make the seam invisible).
Now work 66 single crochets in the stitches of the belt in the horizontal line.
I reset the numeration because now I start crocheting the bottom part of the trousers.
Rnd 1: 66 sc [66]
Rnd 2: 1 sc, ch 5 (skip 5 st of previous round) – it will be the opening for the tail, 60 sc [66] → see picture below.
Rnds 3–16: 66 sc [66]
Now I have to adjust the marker placement to divide the circle into two parts because I will make two legs. The opening for a tail should be in the centre (the line symmetry) of the trousers. Each leg counts 33 sc in the round. I work 7 sc (less or more – it depends of the tail opening) and change marker placement (it is the orange marker in the picture below).
From rnd 17 I crochet the right leg (picture below).
Rnd 17: 33 sc, join with the marker stitch to form the right leg.
Rnds 18–23: 33 sc [33]
Rnd 24: 33 sc, sl st
Rnd 25: ch 3, (FPDC, BPDC) x 16, sl st, ch 1 (picture below)
Rnd 26: 33 sc [33]
Start the 2nd leg next to the right leg. Crochet from right to the left, as always you work in countinuous spiral rounds.
THE UPPER PART – FLAPS
Mark the centre point in front of the trousers and count the same number of stitches on both sides.
I count 8 stitches from the centre point, so I have 17 st in the row. Work 1 tch at the end of each row.
Rows 1–8: 17 sc, 1 tch, turn [17]
Trousers – FRONT FLAP. I marked the flap with 3 orange
markers (centre and two extreme points)
markers (centre and two extreme points)
To mark the back flap I count 16 st on both sides, starting from the extreme points of the front flap.
After crocheting the back flap I don’t cut the yarn and start braces (the right one).
BRACES
Rows 1–20: 5 sc, 1 tch, turn [5]
Row 21: 2 sc, ch 2 (skip 1 st), 2 sc, 1 tch, turn
Row 22: 6 sc
Check if hole for the button (ch 2 worked in row 21) is enough for your button size. If it’s OK, sew the buttons to front flap. I chose the cars.
POCKETS
LEFT POCKET
Work in rows. Don’t make 1 tch at the end of even rows.
Row 1: ch 10, insert the hook in 2nd st and work 9 sc, 1 tch, turn [9]
Row 2: 9 sc, turn [9]
Row 3: skip 1 st, 8 sc, 1 tch, turn [8]
Row 4: 8 sc, turn [8]
Row 5: skip 1 st, 7 sc, 1 tch, turn [7]
Row 6: 7 sc, turn [7]
Row 7: skip 1 st, 6 sc, 1 tch, turn [6]
Row 8: 6 sc, turn [6]
Row 9: skip 1 st, 5 sc [5]
Fasten off, cut the yarn.
RIGHT POCKET
Work in rows. Don’t make 1 tch at the end of odd rows.
Row 1: ch 10, insert the hook in 2nd st and work 9 sc, turn [9]
Row 2: skip 1 st, 8 sc, 1 tch, turn [8]
Row 3: 8 sc, turn [8]
Row 4: skip 1 st, 7 sc, 1 tch, turn [7]
Row 5: 7 sc, turn [7]
Row 6: skip 1 st, 6 sc, 1 tch, turn [6]
Row 7: 6 sc, turn [6]
Row 8: skip 1 st, 5 sc, 1 tch, turn [5]
Row 9: 5 sc [5]
Fasten off, cut the yarn.
Crochet single crochets around the edges of each
pocket to smooth the edges (see pictures below).
Right pocket
Left pocket
Sew the pockets (dashed line indicates the seam):
BOW TIE
I used Lisa Red Heart black color, crochet hook 3 mm.
Big rectangle:
Row 1: ch 9, insert the hook in 2nd st from hook and work 8 sc, 1 tch, turn [8]
Rows 2–13: 8 sc, 1 tch, turn [8]
Row 14: 8 sc [8]
Then work single crochets around the edges: 14 sc on two long sides and 8 sc on short sides [44]
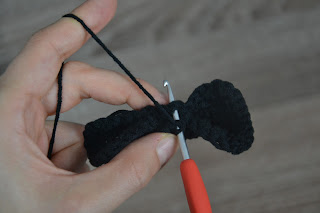
Small rectangle to wrapped around the bow tie.
Row 1: ch 4, 3 sc [3]
Rows 2–8: 3 sc [3]
Wrapp small rectangle around the bow tie and join two ends into a circle with 3 sl st.
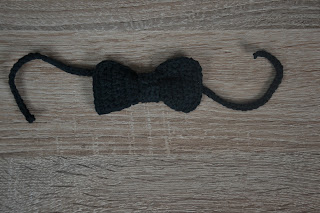
Don’t cut the yarn. Make 2 straps for the bow tie:
Firstly work ch 35, insert the hook in 2nd st and work 34 sl st. You came back to the centre of the bow.
Now make the 2nd strap in the same way.
FRONT
BACK
Outfit for Mr Bear is complete!
See also:
- Written pattern for Lady Bear outfit on blog - SOON
- Tutorial about Bears in Love on YouTube
- Amigurumi Workshop - Bears in Love on YouTube
- pattern: Bears in Love crochet pattern in printable PDF file on Etsy
If you have any problems with the pattern, send me a message :-)


Komentarze
Prześlij komentarz